
Clay to Collector
 Many have asked about my process from the beginning to the finished bronze. To share the actual creative process with you would be much like asking you to watch grass grow.
What you are about to learn is much more fun!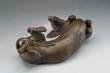 Bronzes are crafted by hand, one at a time, using the lost wax casting method, a technique that has been used for thousands of years. While many sculptors hire a full service foundry, I have more control over quality by being a general contractor. I hire my hand selected specialists in Colorado, USA. I invite you to learn the procedures as you follow the many steps in the many highly skilled hands ahead:
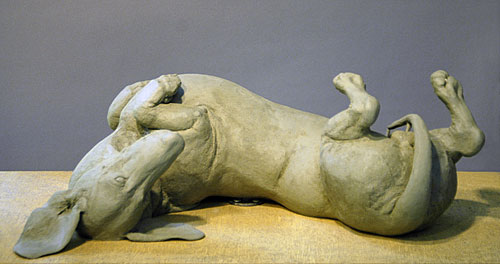
 Step One: The ORIGINAL ~ Person One: The SCULPTOR
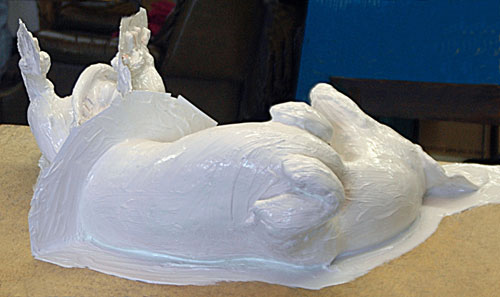
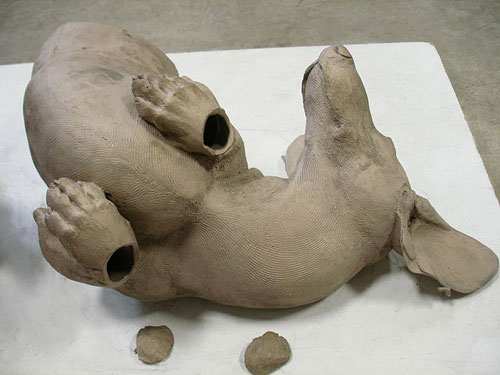
The "ORIGINAL" can be made of clay, wax, stone, wood, steel, or whatever the sculptor used to create the original model.
Modern mold rubbers are compatible with clays that are oil-based and sulphur-free. For life-sized pieces I prefer Chavant Le Beau Touche' light green, because it handles much like my favorite water-based clay which is not compatible with mold rubbers. For 1:6 scale miniatures, I model originals directly in wax. In turn, that wax original is molded, using a similar process to what you are about to see.
I drive the finished clays from my home in Chesterfield, Missouri, to my mold maker in Buena Vista, Colorado.
A dear friend and teacher, Jaye Gregory, once told me, "Joy, you are not 17 any more. You do not have time to learn how to make an excellent mold. Find a good mold maker." She gave me very good advice.
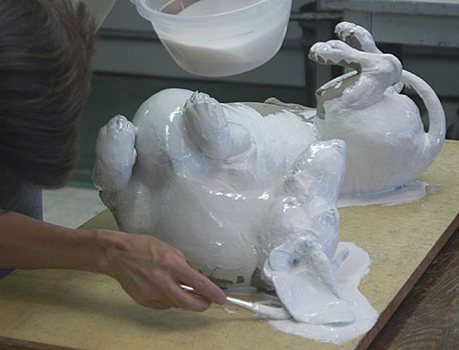
Since 1996, I have followed a good mold maker from Denver to Golden, to Salida, and then to Buena Vista, CO. I have watched Annette develop from a good mold maker into a fabulous mold maker and I am grateful to her. You will see her shortly making the mold for "Sunnyside Up." Step Two: The MOLD ~ Person Two: The MOLD MAKER
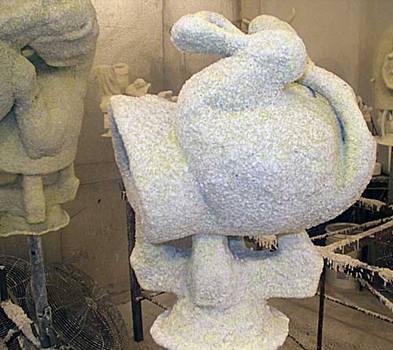
Part One: The RUBBER, First Coat, View One
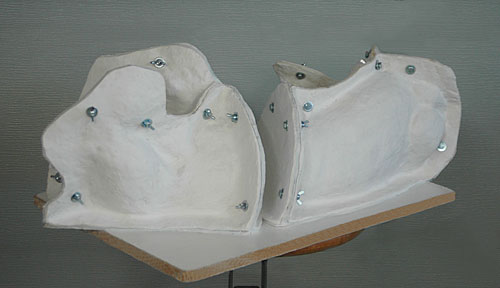
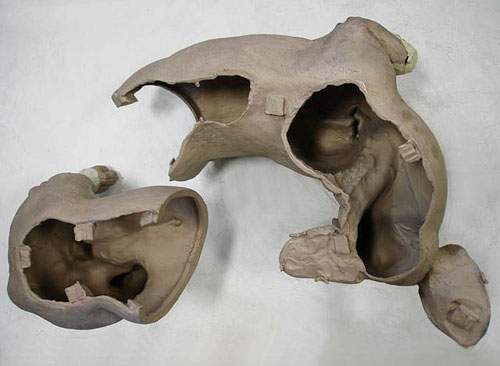
The best mold, from which numerous waxes can be pulled, (and thus numerous bronzes may be cast) is made of Silicon Rubber. When a sculpture is larger than palm-sized, the mold is made of two parts: One, The Rubber, and Two, The Jacket.
Part One: Layers of silicon rubber are applied to the Original Sculpture over the course of several days, allowing the layers of rubber to cure between coats.
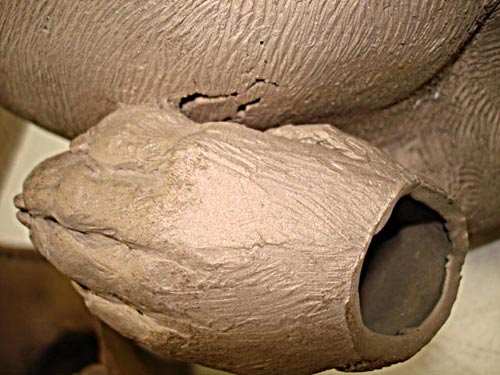
The First Coat of Rubber is the FIRST CRITICAL STEP in replicating my original surfaces. The First Coat MUST be applied with utmost care to avoid bubbles and voids in undercuts. Part One: The RUBBER, First Coat, View Two
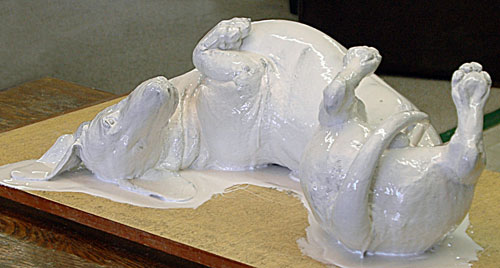
A small brush accesses details. Part One: The RUBBER, First Coat, Complete
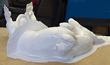 Part One: The RUBBER Divided, View Two
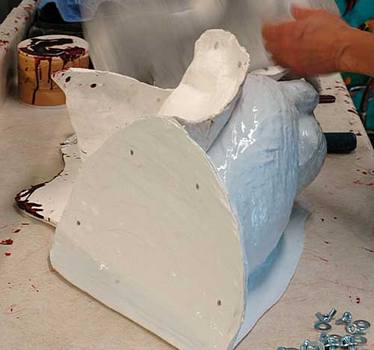
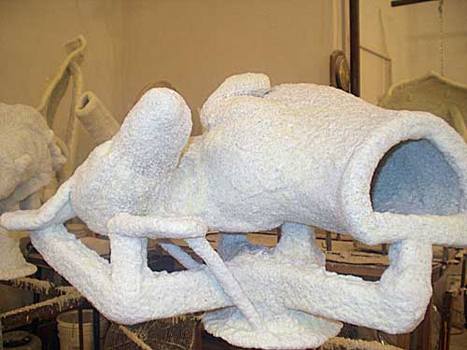
The mold is now ready for Part Two: The Jacket.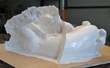 Part Two: The JACKET Complete, View One
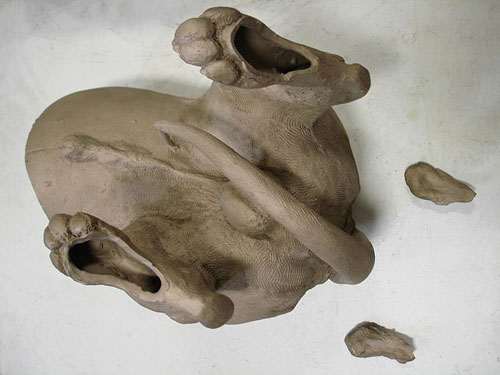
The Jacket is formed around the flexible, rubber mold for support. The Jacket, which is made of fiberglass reinforced plaster or Hydrocal, prevents distortion after the Original Sculpture has been removed. Three-dimensional sculptures usually require multiple-piece molds as shown in this finished mold of "Sunnyside Up" with the dog's ear to the left. The Jacket clearly shows the division of front to back, with bolts and nuts holding it together. The learning process for making an excellent multiple piece rubber mold can take years. A novice should hire a professional, or make a plaster waste-mold of the original and make a plaster cast. From this, a rubber mold can be made without risk of "losing" the original. The higher the quality of the mold, the more time and money will be saved in production.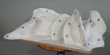 Part Two: The JACKET Complete, View One
The Jacket is formed around the flexible, rubber mold for support. The Jacket, which is made of fiberglass reinforced plaster or Hydrocal, prevents distortion after the Original Sculpture has been removed. Three-dimensional sculptures usually require multiple-piece molds as shown in this finished mold of "Sunnyside Up" with the dog's ear to the left. The Jacket clearly shows the division of front to back, with bolts and nuts holding it together. The learning process for making an excellent multiple piece rubber mold can take years. A novice should hire a professional, or make a plaster waste-mold of the original and make a plaster cast. From this, a rubber mold can be made without risk of "losing" the original. The higher the quality of the mold, the more time and money will be saved in production.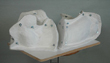 Part Two: The JACKET Complete, View One
The Jacket is formed around the flexible, rubber mold for support. The Jacket, which is made of fiberglass reinforced plaster or Hydrocal, prevents distortion after the Original Sculpture has been removed. Three-dimensional sculptures usually require multiple-piece molds as shown in this finished mold of "Sunnyside Up" with the dog's ear to the left. The Jacket clearly shows the division of front to back, with bolts and nuts holding it together. The learning process for making an excellent multiple piece rubber mold can take years. A novice should hire a professional, or make a plaster waste-mold of the original and make a plaster cast. From this, a rubber mold can be made without risk of "losing" the original. The higher the quality of the mold, the more time and money will be saved in production. Part One: The WAX POUR, Coat One
The Wax Person, in more cases than not, is an individual who specializes in pouring waxes. I am fortunate in that my mold maker has chosen to also pour my waxes. She is an expert at both procedures. Liquid Wax is brushed, ladled or poured into the warmed mold. Note the ear with a thin coat of wax at the lower right of the mold. The First Coat of Wax is the SECOND CRITICAL STEP necessary to replicate my intricate grooved surfaces; the wax and the mold must each be an ideal temperature so that the wax slides into each little groove resulting in minimum air bubbles.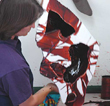 Part One: The WAX POUR, Coat Two
Pouring wax is a active process that must be well timed between coats to assure that the layers adhere to each other. After the second coat, notice the wax is slightly heavier on the ear above Annette's hand. Part One: The WAX POUR Complete
The wax of the front half of "Sunnyside Up" has been trimmed and is cooling. Note the final thickness of the ear at the lower right section of the wax. Part Two: The WAX BIRTH, View One
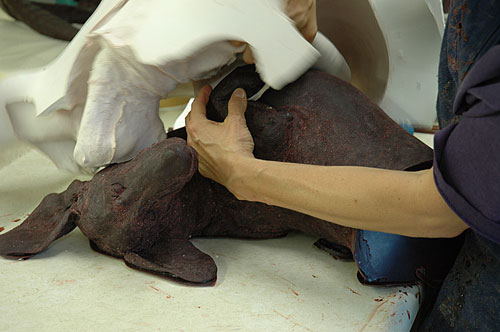
After the wax pour is complete, the right half of the rubber is exposed. The Jacket must be completely removed from the rubber in order to remove the wax. Part Two: The WAX BIRTH, View Two
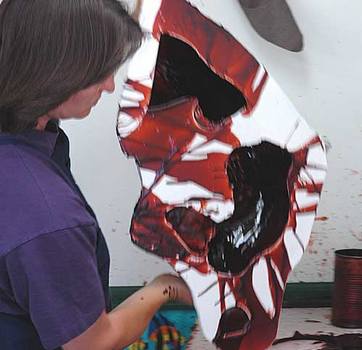
Great care must be taken to neither break the wax, nor rip the rubber while removing The Rubber.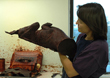 Part Three: Admire the Wax!
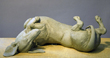
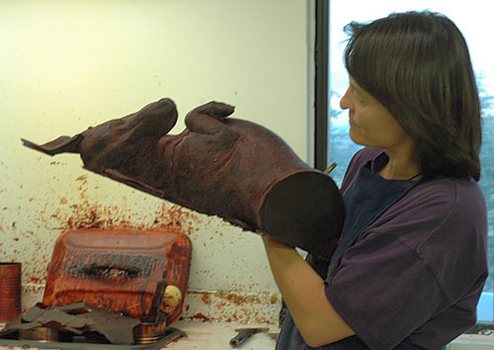
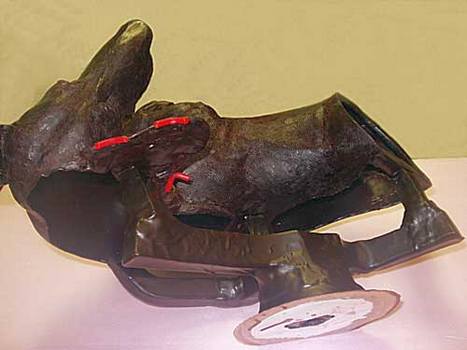
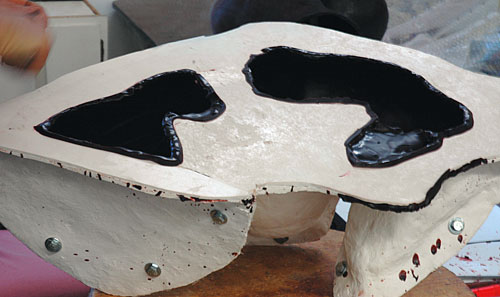
Next Steps for Annette: Carefully fit the mold back together and store properly. The WAX CHASER chases, or fixes, seams, bubbles and edges, imperfections in the raw wax, making it as close as humanly possible to the surface of The Original sculpture. Many sculptors with foundry friendly surfaces hire a professional wax chaser. Early on, I found that the intricate surfaces that everyone likes are NOT easy to chase. I tried professionals and learned that in order to retain as much of my original surface as possible, I must personally chase each wax of my figures. Chasing wax is a tedious, multiple hour procedure. It is the least favorite part of creating my work. The finished wax is a POSITIVE replica of The Original clay, in two parts.
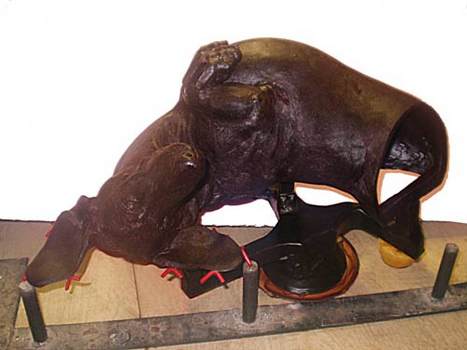
Step Five: SCULPTOR INSPECTS!!!!!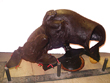 Note the hollow wax and three small red vents on the ear. When bronze ultimately replaces the wax, the bronze will also be hollow.
Next Step, SHELL!
Photo courtesy of Gary Pitcher, Dragon Castings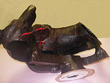 Note the hollow wax and three small red vents on the ear. When bronze ultimately replaces the wax, the bronze will also be hollow. Next Step, SHELL!
Photo courtesy of Gary Pitcher, Dragon Castings The Ceramic Shell is formed by repeatedly dipping the sprued wax into a vat of liquid ceramic. It is dipped and thoroughly dried about eight times until the shell is the desired thickness.
The Ceramic Shell is the THIRD CRITICAL STEP in replicating my intricate surfaces. The mixture must be perfect to lesson the possibility of surface bubbles, or dreaded flashing. Flashing is where the shell may crack, forming a fan of bronze perpendicular to the surface during the bronze pour. My work has not experienced flashing since I have had the good fortune of working with a very small caring foundry.
Photo courtesy of Gary Pitcher, Dragon Castings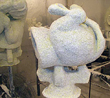 The ceramic shell, is the THIRD CRITICAL STEP in replicating my intricate surfaces. I have the good fortune of working with a very small foundry with persons who care a great deal about their quality. I am very lucky.
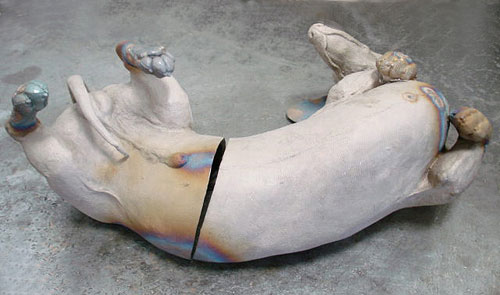
"Life's a Ball" front is vertical in left background.
Photo courtesy of Gary Pitcher, Dragon Castings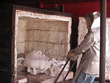 The Ceramic Shell is inverted and heated in an oven, causing the wax to melt out. Hence the term, "LOST WAX." Yikes! The Ceramic Shell is now all that is left in order to create the bronze cast!
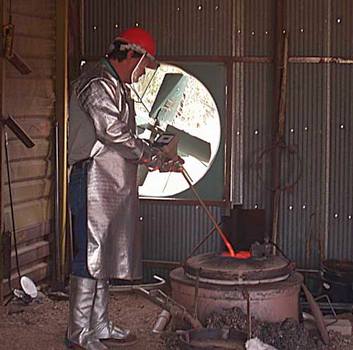
Photo courtesy of Gary Pitcher, Dragon Castings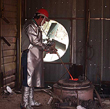 Bronze is heated in a furnace to approximately 2250° Fahrenheit.
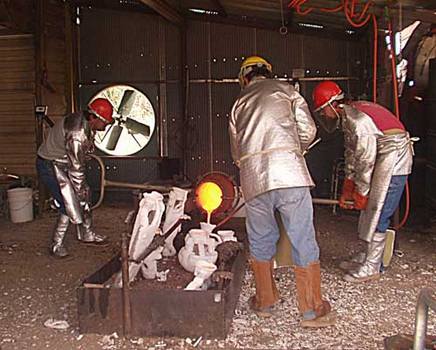
Photo courtesy of Gary Pitcher, Dragon Castings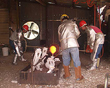 When the ceramic shell is cool, it is taken to a securely walled "sand box." Sand supports the shell to protect it from breakage during the bronze pour. The NEGATIVE space in the ceramic shell will become the POSITIVE bronze cast.
Photo courtesy of Gary Pitcher, Dragon Castings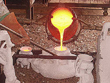 Molten Bronze is poured into the cup of the prepared Ceramic Shell. Sand supports the critical Ceramic Shell to protect it from breakage during the bronze pour. The NEGATIVE space in the Ceramic Shell will become the POSITIVE bronze cast. When the bronze is cool, the shell is broken away. The bronze is then blasted with tiny beads to remove the Ceramic Shell. Sprues and vents are sawed off. At this time the cast is called a "raw metal."
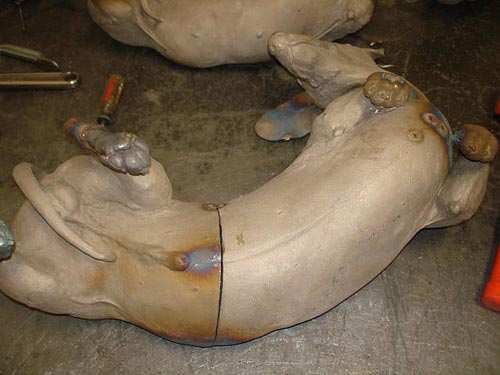
Photo courtesy of Gary Pitcher, Dragon Castings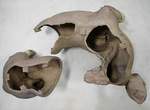 Straight from the foundry! When the bronze is cool, the ceramic shell is broken away. The bronze is bead blasted to remove the shell. Sprues and vents are sawed off. The cast is now a "raw metal. Note the square bronze sprues, that were formerly wax sprues, through which metal flowed into the body of the dog. Masking tape holds four plugs that were taken from the rear feet and the front wrists and were cast separately to provide added ventilation for the ceramic slurry to dry properly inside the tightly enclosed foot areas of this piece.
Photo courtesy of Nancy Palm, Metal Chaser Extraordinaire!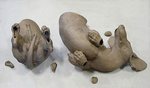 Next step: Chase that Metal!
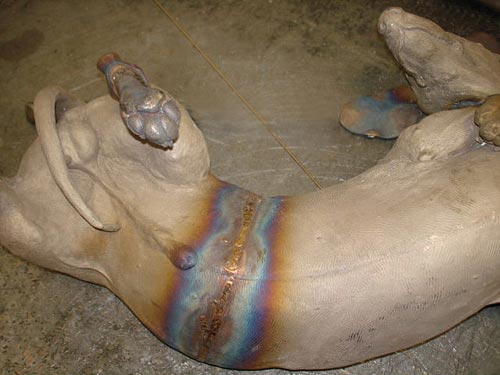
Photo courtesy of Nancy Palm, Metal Chaser Extraordinaire!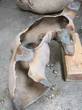 Sprues have been cut off of the bottom. The belly of "Sweet Roll" is in the background.
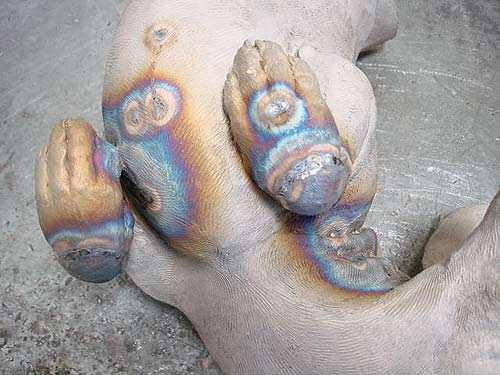
Photo courtesy of Nancy Palm, Metal Chaser Extraordinaire!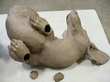 Note the V-shaped vent on the lower edge of the ear. This vent allows air to escape from the shell into the vent so that bronze pours into all portions of the ear. The reason for a vent is it is easier to cut off and repair a small vent area than to rebuild and retexture an ear that has not fully poured.
Photo courtesy of Nancy Palm, Metal Chaser Extraordinaire! The extra metal under this paw is called shrink. Somehow it occasionally happens in areas that are very close to together, where heat does not dissipate as easily as on a large open surface, such as a belly.
Photo courtesy of Nancy Palm, Metal Chaser Extraordinaire!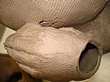 The gorges in the metal above this front foot were caused by invisible bubbles that were close to the wax surface before it was dipped into ceramic shell.
Photo courtesy of Nancy Palm, Metal Chaser Extraordinaire!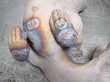 The plugs have been welded in place and additional corrections made.
Photo courtesy of Nancy Palm, Metal Chaser Extraordinaire! Photo courtesy of Nancy Palm, Metal Chaser Extraordinaire!
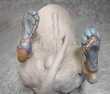 Photo courtesy of Nancy Palm, Metal Chaser Extraordinaire!
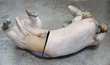 Photo courtesy of Nancy Palm, Metal Chaser Extraordinaire!
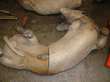 Photo courtesy of Nancy Palm, Metal Chaser Extraordinaire!
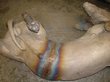 After welding, the metal chaser carefully and magically retextures the surface to closely resemble the sculptor's original marks. In this image a vent still connects the end of the tail to the body, and the ear vent has been roughly removed.
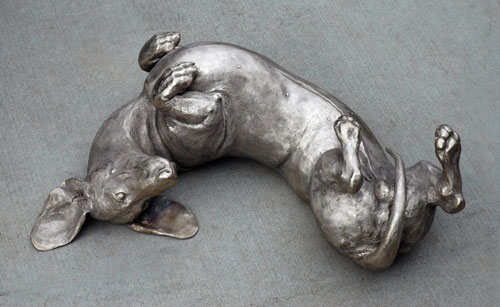
Photo courtesy of Nancy Palm, Metal Chaser Extraordinaire!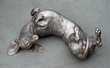 A Metal Chaser has carefully aligned, welded and repaired seams, sprues and vents to closely resemble my original surface of "Sunnyside Up". Stainless nuts have been welded underneath to accommodate bolts, should one want to secure the piece in an outdoor setting. The chased cast has been cleaned of fingerprints and grime. It has been bead-blasted, and blue padded clean in preparation for patina, and it is a glowing platinum color! Step Twelve: SCULPTOR INSPECTS!!!
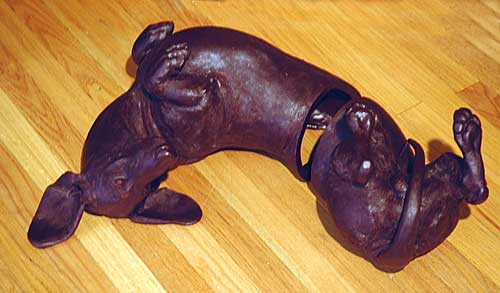
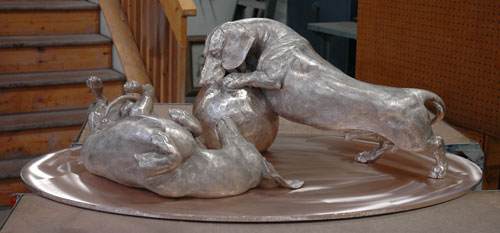
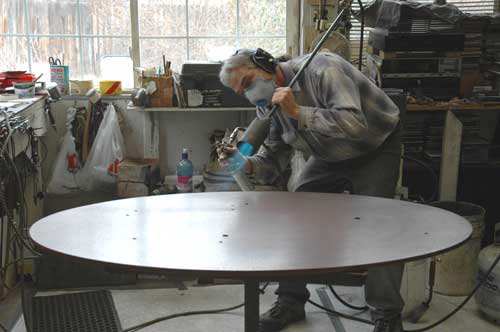
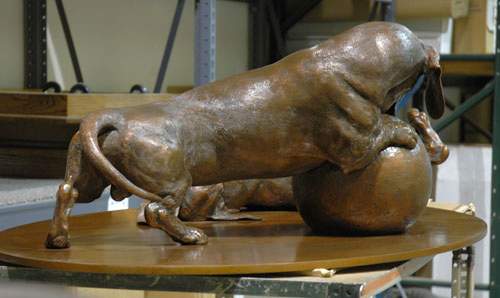
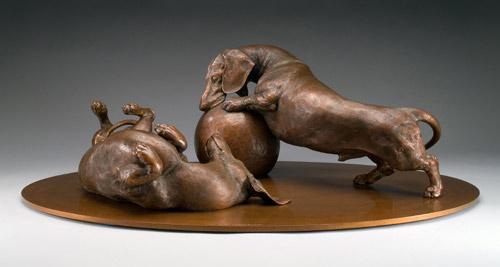
Next Step: Patina! But, before I share that, I will show you some steps about how a base is made for "Pals" which is the combination of "Sunnyside Up" and "Life's a Ball!"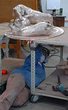 Going forward, "Sunnyside Up" and "Life's a Ball" are shown playing as "Pals". When a piece has a base other than bronze, a base specialist is employed to make a custom base. This can include a waterjet person, wood worker and/or a stone specialist.
A Base is custom designed for each sculpture that requires a base. Basing "Pals" requires many steps and specialists:
1. Buy the bronze plate, pay to have to shipped to Dream Chasers, Loveland, CO.
2. When I get to Loveland, drive the plate to Colorado Waterjet in Berthoud, CO.
3. Waterjet the rectangle into an oval of bronze.
Part One: Computer generate a design to send to the waterjet machine.
Part Two: Place the plate on the 6' x 12' machine and watch it work its magic!
4. Drive the plate back to Dream Chasers.
5. Two or more persons place the 200+ pound oval plate on two rolling tables.
6. Chase and grind the bronze plate, eliminating imperfections.
7. Site the dogs on the base.
8. Create two templates, marking where the inside nuts are underneath the dogs.
9. Drill holes for securing dogs. Countersink holes.
10. Attach dogs to assure a proper fit.
11. Detach dogs.
12. Drill holes to secure base to pedestal with 3/8 or ½ inch stainless all thread.
13. Drive plate and dogs to patinuer.
14. Pick up patinaed parts, drive to Dream Chasers for reassembly.
15. Take to photographer.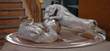 After disassembly, "Pals" will be ready for patina!
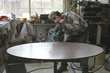 Master Patineur Dale Cisek applies chemicals to the bronze, which has been heated with a torch to create a permanent color change called patina. The patineur and I decide between two sealants to protect the patina. The traditional method of protection is to apply several thin coats of clear paste wax to the surface, which is then lightly buffed with a soft, clean, pure cotton cloth. This patina should last indefinitely indoors. However, if persons repeatedly touch certain areas, bronze may be expected to eventually shine through. Because today's outdoor atmosphere is more corrosive and carries a higher content of manmade pollutants, a more durable, lacquer metal protector is recommended. G.J. Nikolas & Co., Inc. manufactures lacquer sealants designed specifically for copper and its alloys. These lacquers produce a plastic-looking, high-gloss finish. Therefore, the sculpture is waxed to create the soft look of a traditional patina.
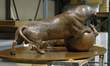 Although I personally chase each of my waxes and check each finished metal, due to the handmade nature of the casting process, each cast and each patina will be similar, but unique. After all, each is crafted by hand, one at a time.
Volumes have been written on the subjects of mold making, casting and patina. I hope you have found this overview interesting and enlightening. Recommended reading:
Patinas for Silicon Bronze & The Care of Bronze Sculpture by Patrick V. Kipper Loveland Press ~ 800.593.9557 ~ www.LovelandPress.com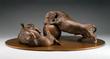 While professional photography is not essential for the production of a bronze, it is critical to the presentation of each bronze. Mel Schockner has provided an honest and glorious view of "Pals". I am grateful for his expertise and friendship.
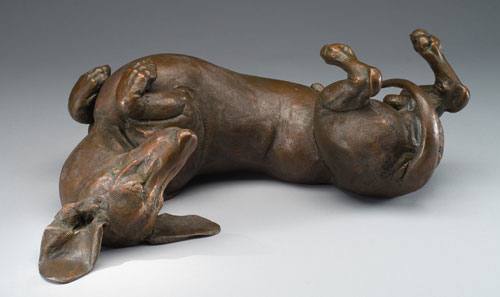
Photography by Mel Schockner While professional photography is not essential for the production of a bronze, it is critical to the presentation of each bronze. Mel Schockner has provided an honest and glorious front view of "Sunnyside Up". I am grateful for his expertise and friendship.
Photography Mel Schockner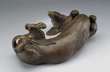 While professional photography is not essential for the production of a bronze, it is critical to the presentation of each bronze. Mel Schockner has provided an honest and glorious rear view of "Sunnyside Up". I am grateful for his expertise and friendship.
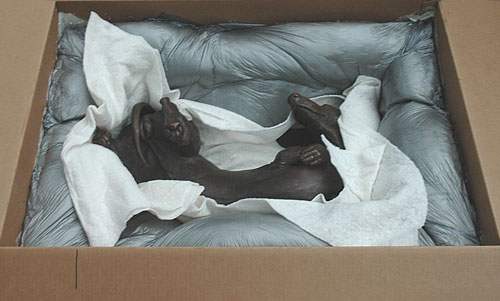
Photography by Mel Schockner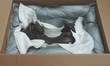 When a collector has space to store a custom box for a future move, a life-sized piece is shipped in a custom box. Otherwise, it is bubbled and packed securely to assure perfect arrival. I personally pack smaller pieces in cotton and bubble.
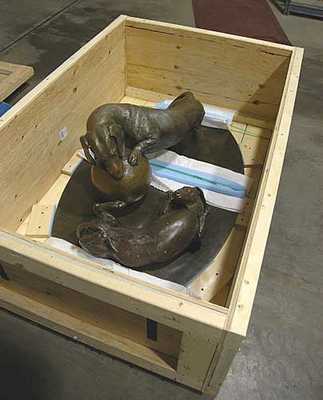
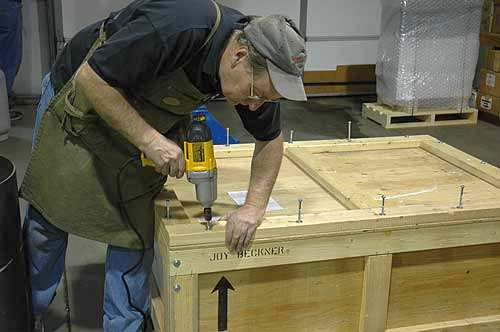
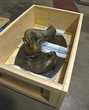 Each LARGE life-sized piece arrives in a custom crate.
 Each LARGE life-sized piece arrives in a custom crate.
 THANK YOU!
Annette Olson - Mold Maker/Wax Person - 1997 until her death in 2010
Jason Frederick Law - Mold Maker/Wax Person, trained by Annette - Since 2010
Gary Pitcher, Sharon & Dale, Dragon Castings - Since 2001
Nancy Palm - Metal Chaser - Since 1998
Dale Cisek - Patinuer - Since 1997
Mel Schockner - Photographer - Since 1998
Don Casper Photographer - Since 2008
Sheree & Jim Lambert, Shippers Supply - Since 1997
Dan Nibblelink, Colorado Waterjet - Since 2001
Bryan Wright - The Base Shop - Since 2001
John Ward, Master Marble Turner - Since 1996
Sandra Wilmoth, Midwest Marble & Granite - 1996 until retirement in 2012
Marty Hassing, Tina & Guy, Summit Jewelers - Since 1999
Many thanks too, to
My friend and teacher, Jaye Gregory - Since 1990
My friend and dachshund anatomy mentor, Weldon B. Long – 1995 to his death in 2007
Bill West, My Web Guru - Since 1999
and last but not least ...
Many thanks to my husband Brian and his mother Jeanne. And, many thanks to my to my collectors.
You are the best !!!
Joy
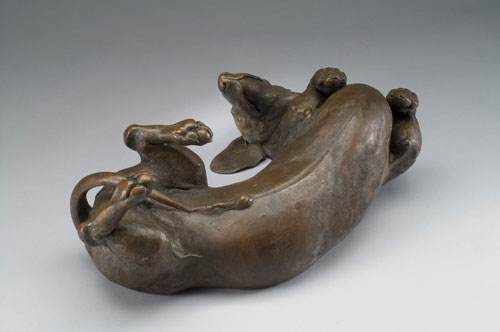


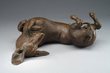
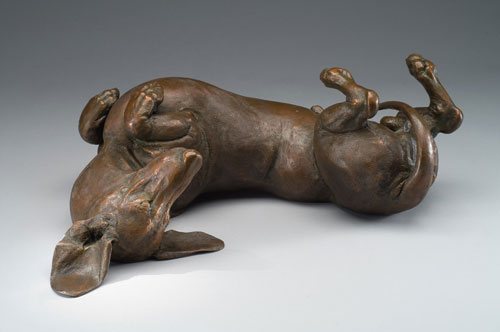
"Sunnyside Up" ©2006
Many have asked about my process from the beginning to the finished bronze. To share the actual creative process with you would be much like asking you to watch grass grow.
What you are about to learn is much more fun!
What you are about to learn is much more fun!
